The CSX: September 13, 1999
by Russ Knize on Sep.13, 1999, under CSX
It appears that the stabilizer bearing has self-destructed. On the way home from the SDACCL meeting on Saturday, I started to notice a sort of vibrating metal-to-metal squeak that was getting louder and louder. When I got home I found the entire left side of the tranny covered in oil. I guess the bearing just can’t handle it. So, it appears that I will be looking for a replacement differential.
Before the meeting I was able to install the new “Jessie Buhr” 2-1/2″ aluminized exhaust system (thanks Mark!). The fit was mediocre at best and some bending and cutting/rewelding was required. It’s still a bit off, so I will have to make some tweaks to it. Aside from that, it is a nice system. The original 2 1/4″ exhaust with no muffler droned way too much when cruising. So, I opted for a Dynomax Super Turbo muffler (part# 17710). It’s a nice unit and is the perfect length to fit in a P, J, or G-body. It’s a 7″ round, 18″ long unit. It has a nice sounding idle and seems to be quite good at the top end. Not as good as an open pipe, but good enough for me.
The CSX: September 10, 1999
by Russ Knize on Sep.10, 1999, under CSX
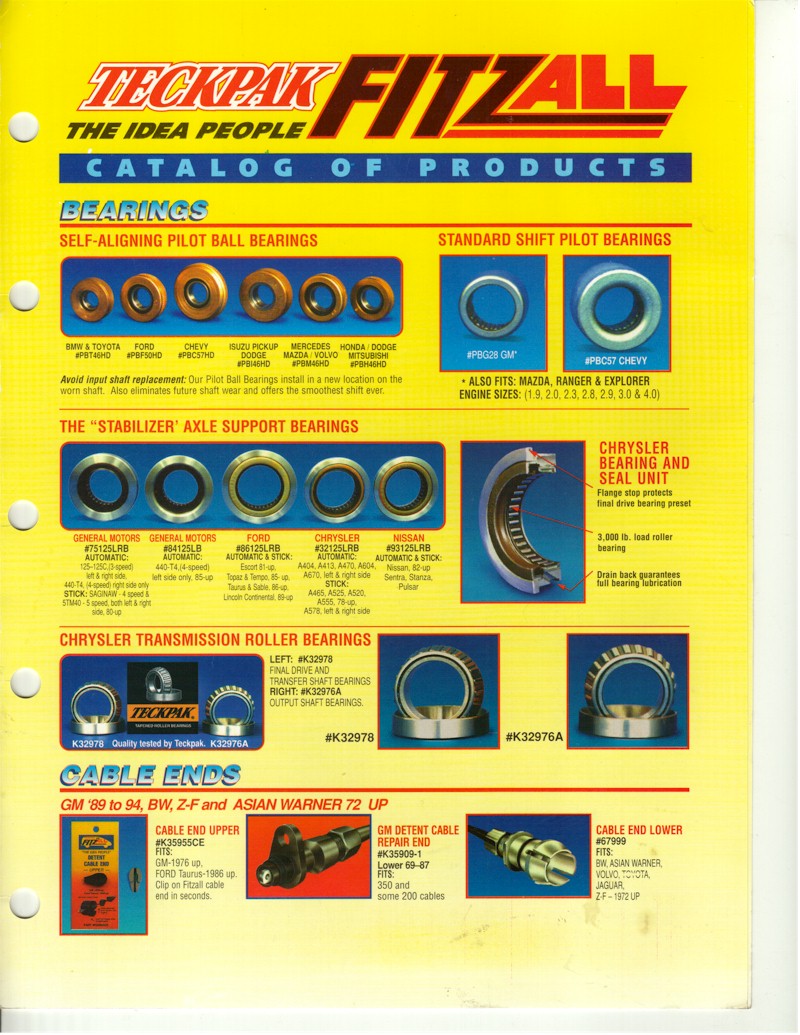 I believe that I have found a “patch” for my current transmission problems. Thanks to Joe Dzwil, I was able to install a Techpak-Fitzall Chrysler Axle Stabilizer Bearing (part# 32125LRB). It’s a neat little unit that installs in place of the stock seal and oil slinger in the trans. It has an integral roller bearing and seal that rides on the sealing surface of the axle. A good axle with a smooth and clean sealing surface is required because the roller bearing uses the old sealing surface and the new seal uses the very outer edge of the sealing surface, which will be rusty and dirty on a new axle. The extra axle I have was in good shape. Some sandpaper and some rubbing compound later, I had a nice bearing ans sealing surface. The bearing also has some gripping splines to keep it from spinning and an oiling hole that matches the oil feed hole on the trans.
Before installing the bearing, I fully drained the transmission so that I could clean the surfaces properly. I did an “Ed Peters” to it by drilling out the hole in the square-shaped boss on the bottom of the differential housing, and tapping it with a 3/8″ NPT tap. Once it was drained, I plugged the hole with a brass pipe plug using solvent-safe PFTE thread tape (the yellow stuff). Getting good threads in the boss is tricky because it is slightly too large for the first 1/8″ or so. Use a slightly smaller drill bit than is required by the tap. Now I can change the fluid completely without pulling axles or removing the side cover.
Looks like the CSX will be at the SDAC Chicagoland meeting after all!
The CSX: August 26, 1999
by Russ Knize on Aug.26, 1999, under CSX
Well this new tranny appears to have a serious problem. I noticed a bad fluid leak coming from the left axle. I figured that maybe the seal went bad. So, I pulled the axle only to find the seal in good shape but the axle had a lot of play in the differential. I put a tight-fitting socket with an extension into the differential to see if the carrier bearings were shot. I could not make the differential move within the transmission case…it was very solid. Upon further inspection, I noticed that the axis on which the axle “wiggled” was on the axle shaft itself between the CV joint and the differential spline. It appears that the differential case is worn out. The axle shaft also has some wear on it. I have another axle (which actually came with the trans), which has no wear on the shaft at all. This axle was a bit more solid, but still pretty sloppy. Looks like I will have to pull the trans. ARGH!
The CSX: August 23, 1999
by Russ Knize on Aug.23, 1999, under CSX
Well, I have done a lot of work to the car over the past months. Basically, I have been gathering all the parts I need to replace the head on the car. The head that came on it is shot, so decided to try a reman head. Big mistake. I have never seen such crap work in my entire life! Here is a short list of what was wrong with it:
- Someone took a bad belt sander to the back of the head, ruining the sealing surface for the manifolds by putting 0.02″ gouges in it. I managed to smooth the surface out by wet sanding with an orbital sander. Actually worked quite well.
- There were 2 exhaust manifold studs in there (out of 8). They came out no problem, but I had to buy a new set of those as well.
- Most of the valve train was new except for the lash adjusters which were shot, so I had to replace those.
- Then I noticed that 3 of the 4 threaded pipe connections on the thermostat housing had been drilled and heli-coiled. I’m not sure how well that is going to seal.
- The only thing that was nice was the headgasket sealing surfaces. Then I realized that the reason it must be so nice is because the head was shaved. After some measuring with the calipers, I found the head to be shaved by 0.020″. I’m sure glad I have that spare 0.020″ Fel-Pro head shim. Would have been nice if they put some kind of documentation with the head.
In addition to the crap reman head, I installed ARP head studs so that I can stop buying head bolts. I am also trying the MP headgasket this time. I also opted for the FM ported exhaust manifold. This along with the 2.5″ exhaust system I am planning to get should make the top end pretty nice. I did weld a Products For Power 2.5″ high-flow cat onto the stock down pipe. The down pipe is 2-1/4″ at the turbo, but actually necks up to 2-3/8″ after the first bend. This fit fairly well into the 2.5″ cat without a reducer bushing. I then adapted the stock exhaust off of my Shadow as a temporary measure until I find a place to do my 2.5″ exhaust.
I also pulled the trans to install a new LUK Turbo III clutch (with a Turbo II disk) I got from FM. The plan was to reset the preloads on the A520, install new seals, and toss it back in. Well, as luck would have it, I happened upon someone selling an A568 transaxle here in IL!!! An hour’s drive and $550 later, I had myself the ultimate of transaxles: the A568! Thanks Gerry! He also sold me the cables and shifter. I ordered a new set of seals for it since the input shaft seal was leaking and I called FM to ask them to send me the other half of that TIII clutch I bought. I found the shifter knob and boot at a boneyard on a ’92 Shadow with a A543. During the installation I found that a few mods were required, but nothing major. I will have a page up about this sometime in the future. Drop me a line if you’d like the details now.
While I was waiting for parts, I addressed the nasty water leaks in the passenger compartment. The leaks were causing the insulation and carpeting to shrink and rot. I completely GUTTED the interior, insulation and all. This car is noisy enough and I don’t care about 2 or 4 lbs of weight, so I replaced the insulation with heat shield/sound deadening insulation. I also ordered a new molded carpet from Newark Auto. It was an OK fit and a mediocre color match. While it was gutted, I traced all the water leaks by sitting inside during some heavy rain. Most of the leaks were due to bad gaskets and seals. One leak was a body caulk issue, which the car may have had all of its life. I spent a lot of time cutting and gluing the insulation back in, and it feels pretty sound now. I also bought new weather stripping for the doors and had the headliner and visors reupholstered. The interior now looks quite respectable, especially since it is all Shadow ES instead of half ES, half CSX. If everything else holds up (yeah right) I will address the body next year.
The Shadow: July 27, 1999
by Russ Knize on Jul.27, 1999, under Shadow
Well, I have separated this car from my older cars because I have been adding more and more info about it. So, I thought it deserved its own page. I’ve done quite a bit of work since I last updated these pages.
First off, I finally bought new tires and put my original crab (bottle cap) rims back on. I was using 14×5.5″ rims with 195/70 R14 Firestone 350 tires. These tires SUCK in every way, shape, and form. I have had 70 and 75 series tires before, but these are just junk. The dry traction was lousy: I could light up the tires on 2nd gear with only 12psi of boost and the car plowed really bad. In light turns the tires liked to screech. I even got a full alignment: no change. Wet traction was like driving on slicks–I almost got into countless fender benders, but got lucky. Take-offs were impossible. I won’t even talk about winter driving. The tires still have 1/2 of the tread left. I just wanted you to know how HORRIBLE these tires were for me.
ANYWAY, I had replaced my speedo pinion gear to compensate for the larger 195/70 R14 tires and I was enjoying the lower RPMs at highway speeds compared to when I was on my 205/50 R15 Gatorbacks. So, I decided to use the Plus Rule, and got some 205/60 R15s to maintain that ratio. Sears had a sale on Falken ZIEX high performance tires in my size, so I ordered a set. I have to say that these tires are GREAT! I have over 1000 miles on them already, and they seem like they hook up as good as, if not better than the Pirelli 700s on my CSX, and much better than my old Gatorbacks ever did! Wet traction is also very good, which surprised me given the large tread block on these tires. I can go full bore in 1st gear and the tires will keep grabbing. I can feel the control arms “shimmy” has traction switches back and forth between the wheels: time for some polyurethane bushings. Understeer has been dramatically reduced, but when pushed to the limit, the car will plow like it is supposed to. The Falken ZIEX are one of the best performance tires you can get on a budget. I think I will be putting them on the CSX (in 205/50 form) when the time comes.
Is that a plug, or what! 🙂
Another issue I FINALLY resolved with the Shadow is the sagging rear end. All of the P bodies (also H bodies) I have ever seen (except for Shelbys) seem to get tired rear springs rather quickly. The frame in front of the rear tires was about 1/4″ lower than the frame behind the front tires. Rather than replace the springs with new, marginal ones, I opted for some air shocks since I am always hauling stuff around. I installed a pair of Gabriel HiJackers and the cheap air line kit (about $60 total) and pumped them up to about 40psi (minimum is 25psi). Now the car sits 1/4″ higher in the rear than in the front and the car just looks “healthier”. The best part is that the handling has been improved even more! Now the car tracks through the corners with a very solid feel (like my CSX) and will take corners even harder than before (not as well as the CSX, though), but will still break loose and plow, as it should (in case you have never driven an ’87-’88 CSX, they tend to oversteer when you REALLY push them). Also, I can haul heavy items in the rear without bottoming out, and I can accelerate hard without aiming for the moon.
With a cleaned IC and my boost back up to 14psi, the ND T2 SMEC, and the improved handling, my Shadow is just a blast to drive again. Everything on the car works and is functioning well. There is only one problem: the poor Shadow is suddenly suffering from the infamous American Car Paint Peel Problem. The paint has held up well all these years. Suddenly this summer, it’s peeling off the roof, truck lid, tops of the doors, etc in small chunks. Grrr… I’m not sure what to do with it, but I probably won’t touch it this year. If things are still going well, maybe I’ll get it painted next year.
The CSX: February 22, 1999
by Russ Knize on Feb.22, 1999, under CSX
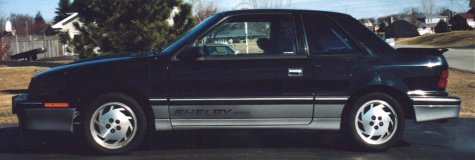
Broke 500 miles on Friday (19th)! Woo! The engine is now broken in. I hooked up the wastegate solenoid around 400 miles and have been enjoying the power. 🙂 The boost likes to creep to 14psi, before the computer pulls it back down to about 11psi. Luckily, I’m not hitting cutout. I guess it’s time to play with restrictors again. I drove the car all the way to work on the tollways and it did just fine, aside from the bumpy ride. Here is the car as of today:
As if that weren’t enough, Arlie Hart is selling a GLHS in New York to a guy in Chicago. He agreed to carry the last two panels with him, so I may have them this weekend!
The next major project will be to gut the interior again and try to find the source of my water leak. The carpeting is getting musty again and it seems to be shrinking. I’m not sure what to do with it at this point. I may have to trash it in favor of some new carpeting. It sure could use it. The headliner is another issue. I plan on buying some headliner material and gluing it on this summer as well.
The only other big problem is the suspension. It definitely needs new shocks and struts, judging by the way it hops all over the place.. I have a lead on some interesting units, otherwise I’ll go with Konis or KYBs.
The CSX: February 7, 1999
by Russ Knize on Feb.07, 1999, under CSX
I had a burning desire to work on the CSX and I had the opportunity last Thursday (the 4th), so I put in some of the parts I had. I also pulled the valve cover and tried to quiet down the valve train by pumping up the new lifters again. While I had the cover off, I replaced the fuel pressure regulator with the adjustable unit from Rick Diogo. I also replaced the spark plugs because they were fouled from running so rich (RN12YC).
After allowing the RTV on the valve cover to cure for a couple days, I started up the engine and adjusted the fuel pressure. I brought it down to 50psi. I took it for a spin and it’s running so much better…much more low-end torque. The plugs looked fine afterwards. I’m still at reduced boost, so I won’t know for sure for a while. It was nice to drive it again.
The dumb thing still has a water leak somewhere. I guess the search will continue. I also installed some of the interior pieces from Arlie Hart, but I still need to get the two, large rear sail panels from him. Anyway, it looks much better with the darker trim pieces.
The CSX: January 18, 1999
by Russ Knize on Jan.18, 1999, under CSX
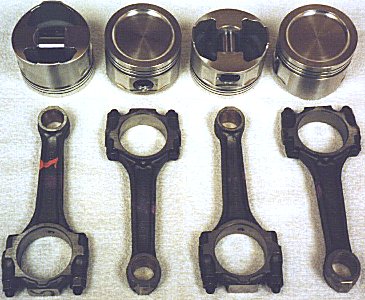
Well, I received the adjustable fuel pressure regulator from Rick Diogo. It is actually for an ’89 or later turbo, but it will work just fine the and pipe connection opens up the option for a custom fuel setup. It appears to be a used unit that has been modified. An aluminum cap with the hose barb and adjustment bolt covers what is probably a cut open, stock regulator. Better than hacking and gluing with JB Weld, or crushing it in a vise, in my opinion. 🙂 I also received the pressure isolators I ordered for the oil and fuel pressure guages that I will be installing. They look like they will do the job and I will add specifics on how to get them to the Mini-Mopar Resource Site when I get the chance. I also updated this page with a picture of the pistons and rods I used on the engine rebuild. I actually had several pictures of the rebuild, but my nice camera and the roll of film they were on met their demise while I was on vacation in December. I am annoyed.
Since it cold outside these days and the CSX is buried in a foot of snow right now, I haven’t done much with it. The old battery also decided that it doesn’t like cold weather and has died. I don’t want to drive this car through the salty roads of a mid-west winter anyway, so it will stay where it is until spring. I will then buy a new battery, install the goodies I have been collecting, and hopefully continue the restoration if I can. I can’t wait to get that ND Performance logic module in there!
My future with this car is becoming uncertain at this point because of certain events going on with my life. I hope I will be able to keep it after all this work and years of waiting to finally get one. Keep your fingers crossed for me….
The CSX: December 1, 1998
by Russ Knize on Dec.01, 1998, under CSX
IT’S ALIVE!!! This unusually warm weather for November has allowed me to finish assembly of the engine. After completing assembly, I filled all the fluids and stared at it for a very long time, trying to think of anything I may have forgotten. I then proceeded to clean the garage to find any parts that I may have neglected to put back on. After all that, I decided that I had stalled long enough. I pulled the ignition wire off of the coil and cycled the ignition switch a couple of times. The fuel pump moaned and pressurized the system. I did a careful inspection of the fuel system, and found a small leak near the fuel filter. After fixing this, I took off the oil fill cap, and tried to crank the engine. Sure enough, it cranked over and after few cranks there was oil to the head. I then reconnected the ignition wire, said a little prayer, and turned the key once more. Three cranks later the engine sprang to life with more clattering and chattering than you can shake a stick at. A few seconds later the brand new lash adjusters were pumped up and the engine quieted down. I watched carefully, with the fire extinguisher nearby, as the oils and other residues left on the manifolds burned off. After a few minutes of idling, the engine stopped smoking and was running smoothly. I kept an eye on the fluids all this time and there were no leaks, but I had to keep topping off the radiator. I believe this was just the air being purged out of the system, but my paranoia kept making me think it was the headgasket. There was no white smoke out of the back even when I goosed it a bit, so I became confident enough to go for a drive. I took it once around my subdivision (1.1 miles) at the lightning speed of 30 mph. The engine ran smoothly and pulled with confidence, even though I was not going into boost or revving it past 3000 rpm at all. I pulled it back into the garage, shut it off, and did a through check over.
Everything looked great, so I started it back up again and went for another drive. I took it easy and put a good 15 miles on it keeping it under 55mph and around 2500 rpm. I let it go into boost a couple of times and I quickly got 5psi, even though the wastegate actuator was tied directly to the manifold. The engine was running great and I finally got to experience what it was like to drive a CSX (I was so wound up on the initial drive home, that I never really got a chance to observe the handling). That super-stiff suspension makes for a bouncy ride on rough roads, but the thing corners like it’s on rails. What a difference from my Shadow ES! Definitely not a touring sedan, but that not why I bought it! 🙂
After my little trip, I pulled it back in the driveway and popped the hood to listen the engine carefully. There was a weird whine coming from the timing belt. I think the shroud may have been rubbing on the intermediate sprocket. Also, I noticed that the BOV was leaking boost when I was at or above 0psi. The BOV should be closed at this point, so I have to look into that.
After over three months of owning the car, I finally got a chance to drive it around. All that work was not in vein! Special thanks have to go to Chris Wright for setting me up with Venolia and pointing me in the right direction, to Neil Emiro for all the advice about the choices in pistons and rods for the bottom end, to Gus Mahon for all the advice and info about the world of boost and compression ratios, to Mike Demoss at Forward Motion for advice and good deals on parts, to Randy Chet for selling me this car and telling it to me straight, to Brian Rachwarter for helping me find the car, to John Johansen for checking the car out in California, and to countless others on the Shelby Dodge Mailing List that have helped me over the past year and a half. Here is a shot of the engine bay as of this date:
That white thing in front of the Turbo I turbocharger outlet hose is an oil catch canister that I have on all my cars. It keeps oil out of the airbox, but in this case, it is venting to the atmosphere. It’s made out of PVC pipe parts and I plan on making a web page for it. I have improved the design well beyond this one, it was just lying around from the days of my Sundance. Obviously, the CSX has no A/C right now, but I plan on installing it over the summer. You might recognize the radiator; it’s from the Shadow ES before it was intercooled. The wires are Splitfire Dual Coils. I have no love for Splitfire, and I have never used their worthless plugs. However, these were on sale for half price, so I grabbed them since they seem to be made very well. If they act up, I’ll pitch them for Magnecores.
The CSX: September 15, 1998
by Russ Knize on Sep.15, 1998, under CSX
In early September of that year, I finally had the time to tear apart the engine to see what was going on. As I disassembled the intake ductwork, I was disgusted to find that the PCV vent line was tied directly to the intake duct, just past the air filter. The large amount of blow-by from cylinder #4 blew oil through the PCV system, through the intake, the turbo, up through the intercooler (!), and into the intake manifold. Most of it ran back into cylinder #4, causing it to burn all this oil. When I pulled the head, I found that the headgasket was fine, the #4 piston was fine, and there were no cracks in the head or block. I expected to see a whole in the piston from all of this blow-by. When I disassembled the head, I found that the exhaust valves guides were worn, but the rest of it looked OK. The head had a multi-angle valve jobs done at some point, so I decided not to mess with the valves and just grind them. After grinding, the valves seated very well, and I decided not to worry about the somewhat worn valve guides. There was no indication of the valve stem seals leaking, but I replaced them anyway. Cylinder #4 was carboned up really bad from the oil, as was #1. The only possibility left was the rings. When I pulled the pistons, I found that the upper ring on #4 was broken is six places and a huge chunk of the ring land was gone. The sides of the piston was badly carboned up from being driven this way for so long. Luckily, there was no scoring on the cylinder wall at all. The ring pieces were held in the piston by a nice coating of carbon.
I was very surprised to see that the block had almost NO wear. There no ridge at the top of the bores, either. I decided to deglaze the bores just to see how it would go. The first few passes with the honing tool showed the bores to be very even. A slight ridge appeared at the top, then disappeared a few passes later. #4 had a small spot where the piston must have been slapping, but it disappeared as well. I re-measured the bores and they were still straight and round. I then made several performance decisions with the help of a few people from the SDML (thanks to Gus, Neil, Dempsey, and Garry). Here are all the parts I ordered for this engine:
- Venolia pistons: 3.4430 diameter, 14cc dish (thank you Chris)
- Full-floating 0.936″ Ford floating wrist pins and spiral-lock retainers from Venolia
- Turbo II rods from Forward Motion
- Rod bearings and piston rings from Mopar
- Lash adjusters from Perfect Circle
- New turbo oil and coolant supply lines
- Fel-Pro headgasket
Here is a shot if the pistons and rods after they had been balanced and the rod ends were modified to hold the larger pin. Pretty pistons, eh?
Along with all that, I replaced all gaskets and seals as well as the radiator and heater hoses, fuel lines, and vacuum lines. I also had to repair all of the wiring harnesses under the hood because of heat damage. The Venolia parts took two months to arrive. So, while I was waiting, I got ready for some future performance enhancements. Here are the parts I collected:
- ND Performance 3-bar computer set to 16psi.
- Fel-Pro 0.020 inch “Head-Saver” head shim to reduce compression to about 7.8:1
- K & N Universal Round filter to fit perfectly on the turbo inlet (RU-0640)
- Conquest intercooler (early version)
- 1st generation Talon BOV
- A bunch of 2 1/4″ exhaust pipe and truck radiator hose
- My own, custom PCV breather and oil collector
I planned NOT to use the ND Performance computer at first. I decided to run with the stock CSX computer and the 804 injectors to take it easy on the engine and make it run rich, which is good for break-in. I would also plug the wastegate actuator can right on the manifold pressure to keep boost very low for the first couple of hundred miles. I would be saving the Conquest intercooler installation until the next summer, so I just used the turbo outlet hose from my ’88 Turbo engine to run the engine as a Turbo I, since I had moved the stock Turbo II components to my ’88 Shadow ES.