Archive for 2025
Power Steering Racks (Saginaw vs TRW Saga)
by Russ Knize on Dec.08, 2025, under Automotive, CSX
One particular part has always been a problem in the after market for these: power steering racks. Parts stores have always done a poor job of keeping track of the different types and their applications (Rock Auto is no exception). For the mid-late 80’s and early 90’s L and K-based stuff, this has been my understanding: there were two main manufacturers: Saginaw and TRW, each having a few variants (different turn ratios, valving, and stops). These are some that I personally know about for K-based cars:
- Saginaw
- 3.18 turns, standard feel
- 2.50 turns, firm feel
- TRW
- 3.25 turns, standard feel
- 2.50 turns, firm feel
- 2.06 turns, firm feel with larger turn radius to prevent wheels from hitting fenders
There are other variants as well (standard feel for larger wheels, L-body, etc). The key difference between the two manufacturers is the routing of the hydraulic lines between the rack and the pump: the fittings at the rack valve body are reversed and offset. So it is not straight-forward to switch between Saginaw and TRW racks unless you also change the lines (though the recent aftermarket situation seems to ignore this routing difference in some applications). If you intend to swap both the rack and the lines, then you can choose whichever is available. Note that this difference has no relation to the pump itself. Earlier models all came with Saginaw pumps (larger, tear-drop shaped metal reservoir), with later models (circa ’88) switching to ZF pumps (plastic reservoir, different tensioner). ZF pumps have their own, unique line set.
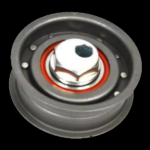
So how do you tell if you have a Saginaw or TRW rack? There are various ways mentioned on the Internet, but the best way I’ve found is to look at how the lines enter and exit the valve body and main body of the rack.
Saginaw racks have the upper pump line fitting (A) towards the front of the vehicle with the lower fitting (B) more towards the center of the valve body. The lines between the valve body and rack run parallel to each other (C and D).

TRW racks have the lower pump line fitting (B) towards the front of the vehicle with the upper fitting (A) more to the center of the valve body. The lines from the valve body to the rack are not parallel, with the shorter line (C) on top and the longer line (D) facing more forward.

That brings us to the aftermarket. Information is becoming scarce and confusing and rebuilders often pay little attention to the various differences above. That said, I was able to uncover the following part numbers for Terrepower (now BBB Industries) racks:
- 102-0101: Saginaw, standard feel, 3.18 turns, for 14″ wheels
- 102-0102: TRW, standard feel, 3.25 turns, for 14″ wheels
- 102-0103: Saginaw, standard feel, 3.25 turns, L-body
- 102-0104: Saginaw, standard feel, 3.18 turns, L-body
- 102-0105: Saginaw, firm feel, 2.94 turns, L-body
- 102-0106: Saginaw, firm feel, 2.50 turns, 14″ wheels
- 102-0107: TRW, firm feel, 2.50 turns, 14″ wheels
- 102-0108: TRW, standard feel, 3 turns, minivan
- 102-0109: Saginaw, firm feel, 2.38 turns, L-body, 15″ wheels?
- 102-0110: TRW, firm feel, 2.06 turns, 15″wheels
Some models are available “new” rather than remanufactured, which have an “N” prepended to the part number (i.e. N102-0101). Whether these parts are still available is a different issue. As of this writing, the 0101 and 0102 variants are not difficult to find (both new and reman). However, the firm feel racks are harder to find and may be special order only (if at all).
An alternative to replacement are the rebuild kits, which are available for both Saginaw and TRW. These are universal across the subtypes. If the issue is mainly with leaking or sticking, a better route may be to clean and rebuild the rack rather than to take a risk on an expensive reman replacement of questionable quality. Reman racks are usually exactly that. I will likely go this route on the CSX.
Turbo Mopars and the Aftermarket
by Russ Knize on Nov.11, 2025, under Automotive, CSX
It is starting to become a little tricky to find certain parts for these cars and the overall quality has been in decline for a long time. While Chrysler’s parts-bin approach has been helpful to keep the unique part numbers for major components down, we are still talking about 30-40 year old cars at this point. The market is drying up, so it makes sense. I’ve been collecting various parts that I know I’ll need to get the CSX back into shape and I’ve noticed some things. I’ll keep updating this as I find new details, as it’s mostly for my own posterity anyway (the Internet of olde is dead). Let the parts hoarding commence!
Engine
Timing Belt Tensioners
ITM 60114
These are still readily available for both the early and common blocks, but I have noticed that most manufacturers have moved to a plastic pully design. Most were either pictured as plastic or were pictured as steel but delivered as plastic (AC Delco). There is still the steel one from ITM (p/n 60114) for the early block and Enginetech (p/n TT192) for the common block, but it is the design with riveted halves that at one point had a reputation for coming apart. Perhaps these could be tack-welded together? Otherwise, we may have reached the point where we need to keep our old tensioners and try to replace the bearings….
Gaskets and Seals
Availability seems fine from most of the usual suspects (Victor Reinz, Fel-Pro). I don’t know if the quality has degraded any, but it generally wasn’t very good anyway. Timken seals are still available for certain applications, which were good back in the day. They look the same to me.
Cooling System
Radiators
There seems to be a manufacturer still making a full-size radiator for these (part number usually ends with “980”). No distinction is made between turbo and non-turbo, but a modern aluminum core likely outperforms the old designs anyway. It is of aluminum/plastic construction, so it would be wise to move away from green coolant over to something more modern. A full flush and change over to a yellow or orange antifreeze (extended-life, Dex-cool, HOAT, etc) is wise to preserve the condition of an aluminum radiator.
Heater Bypass Valves

Later 3×1 arrangement with angled barb.

Later “3×1” arrangement.

Early “2×2” arrangement.
I did notice that a number of listings for heater bypass valves are not correct. There are 3 versions of the same valve, with the only difference being the direction of the top barb. They all seem to be made by the same factory now, as the version with the crimped steel ring is being superseded by the glued version. I refer to different types as:
- 2×2 – used on early “suck-through” turbo setups when the valve is located under the airbox right next to the head.
- 3×1 – used on later “blow-through” turbo setups, sometimes including intercooled depending on the mounting location. These are usually located in the area in front of the trans or under the battery tray.
- 3×1-angled – used on non-turbo and some later turbo setups. Sometimes needed when the cruise control is located under the battery and/or when there is an intercooler and/or some custom setup.
Just look closely at the one you are replacing. For the 2×2, look at ’86 2.2L Turbo. For the 3×1, look at ’88 or ’89 2.2L Turbo II. For the angled version, I found it listed under 1990 turbo models.
Thermostat Housings
The OEM housings like to rust, but new ones were always available for a few bucks. Despite what some of the pictures show, most of the current ones (including Four Seasons) seem to deprecate down to a poorly cast iron/steel housing. It should last, but it doesn’t look right. If you want the stock look, I found that GPD p/n 8241385 arrived as the stamped one. Otherwise look to the billet aluminum housings from FWD Performance, etc.
Hoses
I was pleasantly surprised to see that coolant hoses all seem to be readily available for most setups from known-good brands like Gates and Continental. This includes the short lower radiator hose for intercooled engines (non-L-body) and a number of the custom-molded heater core lines. Some of the listings are wrong, so just look closely at what you have and check nearby models and model years if you don’t see the one that you need.
Chassis
Brakes
For typical stock stuff, parts are still readily available from reputable manufacturers (Raybestos, Dynamic Friction, etc). Most models had rear drums well into the 90s and those parts are easy to find. The later ’89+ rear disc brake setups also have reasonable parts availability, as these were used again on some later models.
The early ’87-’88 solid rear disc brake setup (Shelby and certain Daytonas) was unique, but appears to still have some parts availability. I do see some closeouts happening from a few vendors, but pads, rotors, and hardware are still available even as performance options are dwindling. Rear calipers have not been available for a long time. Rebuild kits are still out there, but replacement phenolic pistons are not. I noticed that the unique parking brake cable is also now discontinued.
Power Steering
Steering Racks
There were two OEM power steering rack manufacturers that were slightly incompatible with each other (Saginaw and TRW), each with a bunch of sub-variants. The reman market has always been a bit of a mess about this, which made it difficult to get an exact replacement rack for certain applications. This topic is a a rabbit hole, so I made a separate post about power steering racks and how to identify them.
Pumps and Lines
Remanufactured and new Saginaw and ZX pumps are still available. While separate line sets are still available for the two types of pumps, I did notice that there is often no distinction between Saginaw and TRW racks. Sometimes separate return lines are shown, but sometimes not. The two rack manufacturers had two different arrangements for the line fittings, but the fittings themselves are the same (M18x1.5 inlet, M16x1.5 return). The only difference between the lines were a few bends and the retaining bracket, so it should be possible to use what is available with some mounting modifications.
Return of the CSX?
by Russ Knize on Sep.12, 2025, under Automotive, CSX

 The CSX, which has been slumbering in the garage for the past dozen or so years, was slowly entombed in boxes of stuff and donations and whatnot. I recently cleaned most of that out with the goal of getting the CSX up and running again. It needs body work and while I have everything I need to fix it, I intend to just bite the bullet and pay a shop to finish it properly for me. Despite my best efforts on Frankentona, I know I lack the skills and facilities to do a proper paint job in my garage. I’m not looking for a concourse finish, just something durable that looks roughly stock and will polish up nice.
 The motor is a bit of a hodge-podge right now. I threw this car back together with whatever I had lying around about 12 years ago, as we had sold our house unexpectedly quickly and I had to clear out and pack the garage. I don’t remember what head is on it, what turbo, what cal, what injectors, what clutch, etc. I do I know the trans is an A555 with an OBX and the axles are Diriveshaft Shop. I kept the motor and trans from the Daytona before I sold it, so I will definitely be using the bottom end from that.
Anyway, I swapped out the decade-old gasoline from the tank, put a new battery in it and it fired right up. No drama.
MythTV on a Raspberry Pi 4 (and 5)
by Russ Knize on Mar.27, 2025, under Computing, Linux
 So I finally bit the bullet and stood-up a MythTV front end on this Raspberry Pi 4 that had been hanging around the office for years. I had back-ordered one during the post-COVID supply chain crunch and it turned up many months (possibly more than a year) later, but I hadn’t had the motivation to tackle the project. The Raspberry 5 announcement reminded me, so I ordered one and decided to try to get Myth working on the RP4 to start. There are some issues with the decoder and graphics software stacks on the RP5 at the moment, but I knew the RP4 would work.
I started with a degree of ignorance and built it in the same way that my other front ends are setup: using Christian Marillat’s “dmo” packages from deb-multimedia.org and running the front end solo in an auto-login X session. This worked fine, but I was not getting good performance and could not seem to get the playback profiles setup the way I needed them. This led me down a rabbit hole; it turns out that a lot of the information in the MythTV Wikis is obsolete and does not apply to modern releases. For example, the recommendation is to use the OpenMAX decoder but no such decoder exists in MythTV 0.33+. The V4L2 decoder is there, but it is buggy and tends to lockup sometimes. The standard decoder drops frames and playback is jerky no matter how I set the read-ahead or fiddle with CPUs. I even tried overclocking it.
While searching for details, I kept seeing references to “mythtv-light“. There is not a lot of explanation as to what it really is or why it is needed. What is so light about it? The wiki talks about the back end, but very little about the front end. What build flags are used? Why is it distributed via a random Google Drive? It all seemed very sketchy, so I wanted to avoid it. Eventually I found a separate git repository that contains packaging scripts for MythTV for a variety of platforms. In there were the scripts for mythtv-light, which seems to focus mainly on making installation as simple as possible from a single package without too many outside dependencies. It’s not really there to support RPi, necessarily.
That said, in terms of the front end (which is all I care about), the RPi MythTV Light packages seem to enable three main things:
- QPA EGLFS rendering support.
- Specific decoder and OpenGL support for the Raspberry Pi.
- Disabled support for all unnecessary libraries and features.
 In terms of overall speed and efficiency, #1 is really important on the Raspberry Pi. By directly supporting Qt’s EGL platform abstraction layer, there is no need to run X at all. Christian’s dmo packages do not seem to support this, as they are build against Qt for X. #2 used to be very important, but that no longer seems to be the case. I believe this is because the version of ffmpeg that ships with Raspian is already setup to use whatever hardware decoders are currently supported on the RP4. The “Standard” decoder in Myth uses ffmpeg, so it “just works” without any special support for RPi-specific OpenMAX libraries. #3 is a nice-to-have, but with 8GB of RAM and X not running I don’t know that is matters so much for the front end on the newer RPi’s. I am getting very good performance on the RP4 and it can *just about* manage to decode 1080p HEVC with only an occasional skip when the bit rate gets too high. The CPUs are pretty busy, though.
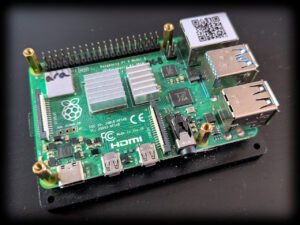
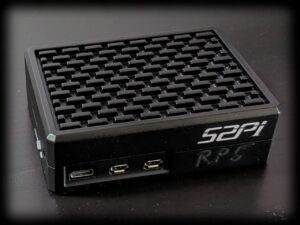 Proper cooling is a must or the SoC will hit thermal throttling. The above RP4 that I used as a test bed just has a base plate and a small heat sink on the SoC. It is not enough: the package temperature quickly rises to 60C under heavy load. There are a few “brands” that list a passively-cooled case on Amazon like the one pictured on the right (there are versions available for RP4 and RP5). It comes with thermal pads for all of the hot packages as well as the bottom of the PCB. The RP4 still gets toasty in mine, but it works well enough if left in the open air (i.e. strapped to the back of the TV). An RP5 is perfectly content in one of these.
I can’t get access to edit the MythTV wikis, so I’ll document my findings here:
- The advice on how to auto-start the front end using cron is…not ideal. You can absolutely start it from the mythtv user account’s .profile. You just need launch it only on a tty session and not for an ssh session. I have mythtv setup to auto-login to tty1, so that is easy. I have a few other configurable options in there, so I’ll share those files here (you can rip out what you don’t need).
- For the issue of the keyboard not working (important if you use a remote that masquerades as a keyboard like I do), it is just a permissions issue. Add the mythtv user to the “input” group in /etc/groups and reboot. Do not start MythTV from /etc/rc.local as the Wiki suggests; that will run the front end as root, which is a bad idea.
- The table showing how to setup the custom playback profile is out of date. There is no MMAL decoder. Use the “Standard” decoder instead. The V4L2 decoder is still listed, but it is not very stable in my experience. The other fields seem to work OK (4 CPUs, etc). Use the “Medium quality” deinterlacer, not the low quality one as I have read in a few places. I got horrible flicker with that one.
- Increase the read-ahead buffer in the advanced settings to quell some of the random stuttering you might see, depending on your network’s performance. I set mine to 400ms, but you can go higher.
- There is no need to set the gpu_mem value in the firmware config. The defaults for RP4 and RP5 are fine. I am overclocking my RP4 as follows:
arm_freq=2147
over_voltage=6
gpu_freq=750
With that feather in my cap, I decided to try a Raspberry Pi 5. I’ve read a lot of conflicting opinions about its viability as a media player, but on paper it looks like a slam-dunk. As with everything on Linux, the issues seem to stem more from the software support and not so much from the hardware. The hardware is very capable. All of the above applies to the RP5 just fine, it just needs a few workarounds at the moment. These will probably not be needed in the future as support for RP5 matures.
- The front end will fail to start EGLFS. This is because the RP5 has two devices for the two GPUs and EGL needs to use the second one for 2D OpenGL. This can be addressed by passing the QPA layer a configuration file that specifies what device and display port to use. Mine is included in the above archive.
Once it’s up and running, the RP5 works great as a front end. Watching the same 1080p HEVC video that made the RP4 get out of breath caused the RP5 to hardly break a sweat. I have not tried 4k yet, but it looks promising. Things should only get better as support for hardware acceleration improves.
MythTV Frontend Saga
by Russ Knize on Mar.26, 2025, under Computing, Linux
 I’ve been using MythTV for more than two decades now. I have separate front and back ends, as I’ve always had some sort of server running in the basement that is on all the time. Our first front end was an original Xbox with a Cromwell BIOS running Xebian. It was just powerful enough to do the job at standard definition and we already had the DVD remote accessory, so it was the perfect choice. The Xebian project was eventually abandoned and despite my efforts to keep Debian on the Xbox going, software bloat made the experience rather sluggish. A VIA EPIA M10000 Mini-ITX system took its place in our living room, while the Xbox moved into our bedroom. We used the EPIA for many years until the capacitors started to fail.
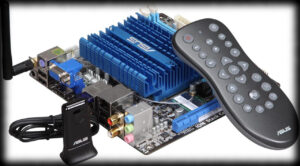 At this point, we had our first HDTV in our basement: a Sony Wega KD-34XBR960 (what an epic boat-anchor of a CRT that was). I was using an ASUS A8N-VM based PC for the front end so that we could watch HD videos and I wanted something to replace the EPIA system that could at least decode HD on our living room SD TV without issue. nVidia, with their ION 2 chipset, was the only show in town with efficient, hardware-accelerated H.264 decoding on Linux that MythTV also natively supported. I picked up an ASUS AT3IONT-I Deluxe and built a new front end around it. The CPU is quite modest (Intel Atom 330), but this board is all about the integrated GPU and nvdec support. It worked fantastically and as a bonus the “Deluxe” version came with a remote that sort-of worked (remote controls and MythTV are a whole other thing).
Eventually it came time to retire the old Xbox and turn it back into a game console: it was getting unusably sluggish and there was no hope of watching any HD programming on it (even though the TV was SD). I wanted to get another identical ION based board, so I picked up an ASUS AT5IONT-I Deluxe. It had a noticeably faster CPU (Intel Atom D550), but was otherwise pretty similar. We used these as our main front ends for many years.
Then came the troubles: nVidia started obsoleting their older drivers and the GPUs on these ION boards were not supported by any of the newer drivers. I managed to limp things along for a few more Debian OS upgrades until it was no longer possible to shoe-horn the required, ancient binary drivers into modern X servers. The open-source nouveau drivers were and still are pretty terrible and did not seem to support the decoder blocks at all. The only way to keep using these old systems was to freeze the OS versions. This only worked to a point, as it became difficult to support newer versions of MythTV on older version of Debian without doing custom builds…which I grew tired of. I ran into the same problem on some of my older laptops and other machines with nVidia GPUs as well. I will not be buying any new nVidia-based hardware for the foreseeable future, as I like to reuse old hardware for other purposes. nVidia has decided to make that impossible by keeping even their most obsolete hardware closed.
Then there was the issue of HEVC. The hardware decoder blocks on these boards were several generations too old to have any support for H.265 decoding and the CPUs were far too modest to handle software decode. My only choice is to avoid HEVC files entirely, but that is getting more and more difficult. H.265 is a far superior codec for dealing with HD and especially 4k, so it is kind of silly to try to keep dancing around the problem.
Finally there is the issue of power. Running all these machines is neither cheap nor wise. I should be using something more efficient that preferably shuts-down when the TV is off.
The obvious choice is the Raspberry Pi. I have been exploring this on and off for at least a decade. I bought a first-generation one when it first came out in 2012. It is a fun little toy that I used on a few little projects, but it didn’t occur to me to try to use it as a MythTV front end. It seemed far too modest. I felt the same about the second-generation as well, though it turned out that with the right build options it could be made to work. While the Broadcom SoC is very capable, the issue has always been software support of the hardware acceleration blocks in Linux. Various licensing issues get in the way of a clean implementation. I did give it a shot with a Raspberry Pi 3, but I was not terribly impressed with it’s performance even after jumping through the necessary hoops to get everything to work. My ION-based machines seemed to work better overall. I was never able to get enough performance to support H.265 decoding on the CPU, so I abandoned it.
Then came the Raspberry Pi 4. It seemed like it was going to be the hot ticket, but I was too late to the party. The post-COVID supply chain crunch made buying any Raspberry Pi a total nightmare. I tried for a long time to get one through legitimate channels, but eventually had to give up. I wasn’t going to spend flipper dollars on eBay for one. Eventually, one of my back-orders got fulfilled and an RP4 turned up in the mail. I got busy with other things and forgot about it, so it sat on a shelf for a long time until….
Cinnamon Workspace Switcher Labels v6
by Russ Knize on Feb.07, 2025, under Linux
I recently switched back to Cinnamon from MATE on one of my machines and found I needed to reapply this patch again. I’ve updated it a bit to support all three modes of operation (workspace desktop preview, workspace labels, and the original useless numbers), selectable from the configuration dialog. You can also specify the button width in label mode, which can be nice if you want control over the aesthetics.
This patch works for version 6.x of cinnamon:
Download it and apply it thusly on a Debian-based system:
$ cd /usr/share/cinnamon/applets/workspace-switcher@cinnamon.org
$ sudo patch -p1 < ~/Downloads/workspace-switcher@cinnamon.org.v6.patch
patching file applet.js
patching file settings-schema.json
$
Then restart cinnamon with Alt+F2 and then “r” and enter.
Flying an Eaglercraft Server
by Russ Knize on Jan.23, 2025, under Linux
 This is a brain-dump of what I ended up doing to setup an “Eaglercraft Server”. I’ve been running small Minecraft servers since around 2011. It was just for myself and a few of my work colleagues. I enjoyed experiencing MC coming out of beta and eventually growing up. We ended up with two servers, the original that started in Beta1.3 became a creative server and a “newer” 1.4 server running in survival mode. Over time, I eventually lost interest in the game but left the servers running. Like so many kids over the past decade or so, mine inevitably got into MC in a big way and still spend time on the old servers with their friends from time to time. I also stood up a third server for them to have a fresh start, since the old worlds are massive and had been generated using such old versions (there are some pretty weird chunk transitions in places). One day, my youngest asked me if I could help him setup an “Eaglercraft Server”. Boy, what a rabbit hole that turned out to be…
I am by no means an expert here, but I wanted to document what I’ve learned. At its core, Eaglercraft is a Javascript port of the Minecraft client that can run in a web browser (I’ll leave the reason why it exists and the origin of the name as an exercise to the reader). Since it was an unofficial port, the project came under fire by Mojang’s current owners and had to go underground to some extent. The client is only currently available in specific versions: 1.5.2 and 1.8.8. There is no such thing as an “Eaglercraft server”, per se. What is actually needed is a Java Edition server configured such that:
- It’s preferably running in offline mode so that unauthorized users can connect…ah-hem.
- It’s reachable by Eaglercraft clients from a web browser, preferably via port 80 if possible.
- It supports version 1.8 clients.
All of these present their own sets of problems, but all are solvable thanks to the amazingly active development community around Minecraft servers. I am assuming that the reader knows how to administrate a Linux server and has background knowledge of operating a Minecraft server. If not, there are lots of resources out there. My goal here was to fill in the missing big picture around what is required.
Authentication
One can, technically, login to an “online” (officially-authenticating) server from an Eaglercraft client by going through a number of convoluted steps to acquire the necessary credentials. Each player would need to do this on their own, which can be a bit of a pain for the less-technically-inclined.
All of that can be avoided by running in offline mode and setting up an authentication server that users can bounce-through when they first connect. There are plugins available for forked servers such as Forge, Spigot, and Paper that implement this: nLogin can provide authentication which will then use BungeeCord to tie the servers together. The authentication server needs to support the same client version(s) as the main server and don’t forget to turn on the whitelist for both if they are going to run offline. The first time a player connects, they will be asked to set a password, which they then have to remember. nLogin offers tools for administrators to reset passwords, etc.
One annoying problem is the UUID generation that nLogin does will conflict with any online Java clients coming in, which then causes conflicts in the whitelist. nLogin has some settings for this, but each has caveats. One workaround is after adding an online player to the whitelist, look for the actual UUID they are using in the logs and manually edit the whitelist.json file to override the generated one for that player. You’ll have to issue a “whitelist reload” command afterwards, but they should be granted access then. The same process needs to be repeated on the main server as well, if it is running a whitelist.
Proxy
To avoid exposing old server versions to the Internet, it is wise to put everything behind a proxy. The PaperMC project has a lightweight proxy server called Velocity that is a good candidate for this, as it supports BungeeCord and many of the required plugins including nLogin and Eaglercraft. The main and authentication servers can then be setup to bind only to localhost, preventing direct external connections. BungeeGuard can also be used as a further protective step.
Note that when using nLogin, the plugin is actually resident on the proxy and not the authentication server. This can be a little bit confusing when trying to manage the plugin from the local console. One has to connect to the proxy console, not the authentication server console.
Server
The primary server that players will play on needs to support 1.8 clients. There are two ways to approach this:
- Run an actual 1.8 server.
- Run a more modern server with ViaVersion plugins.
The first approach is the simplest, but it doesn’t scale well thanks to the many bugs present in Minecraft 1.8. It’s fine if playing among friends that behave themselves or that all agree to use the same exploits. It can also be more fun and nostalgic to play this way, but it can also go horribly wrong. At the very least, use a forked server project for this.
Otherwise, it is probably better to run a newer server and support older clients via ViaVersion. A nice compromise might be to run a 1.12 server, which predates Update Aquatic but fixes a lot of the flaws of earlier servers. This requires the installation of the following plugins:
- ViaVersion – allows newer clients on older servers for those connecting from a modern Java client.
- ViaBackwards – allows older clients on newer servers.
- ViaRewind – expands ViaBackwards support to really old clients, including 1.8 that EaglerCraft needs.
- ViaRewind-Legacy-Support – fixes a number of glitches and bugs that 1.8 clients would normally experience.
Once everything is setup, players will connect to the proxy which will connect them to the authentication server. nLogin can be setup a few different ways, but again be sure to turn on the whitelist. Once authenticated, players are connected to the main server.
Still a Blog?
by Russ Knize on Jan.18, 2025, under Site
Wow, so it’s been almost a decade since I last posted here. I’ve switched hosting situations multiple times in the intervening years and this site has suffered its fair share of bit-rot along the way. I actually took it down at one point, as I assumed no one would notice. It turns out there are a number of forums and whatnot that direct links to files in here, so I brought it back after receiving some frantic emails. WordPress was hopelessly out of date and when I jumped to the latest release, it broke this ancient theme, a number of plugins, and there were also some problems with the DB due to its age (using a very old storage engine). I thought all was lost, but I somehow got it going again. I’m sticking to my guns on this highly dated-looking theme and I absolutely hate the new WordPress editor, but I found this plugin called “Classic Editor” that has saved the day.
So yeah, why am I even posting on here when I know no one will ever read it? Mostly for my own posterity, I guess…and maybe the web crawlers will find these posts and show them on page 6 in their search results. I’ve learned a valuable lesson over the past couple of decades: letting a few huge social media corporations hoover-up all of the discourse on the Internet and move it into their walled gardens has effectively ruined it. A lot of the hobby-related discussions that had moved from email lists into Internet forums back in sepia-times have now moved into Facebook or Reddit. Many of the forums still physically exist, but they’re mostly cobwebs and crickets and/or a fire hose of spam with maybe a few gray beards lurking here or there. Facebook Groups are a terrible replacement for something like a forum, as it’s impossible to find anything and the same questions get asked over and over. Alas, this is where we are now and I don’t see it ever turning around.
I stopped using Twitter about 5 years ago, as my feed slowly morphed into an AI stream of consciousness. I was never into micro-blogging, but I used it as an RSS feed of sorts for the topics and publishers I was interested in. Since it was no longer capable of performing that function, I started playing around with things like Mastodon…even setting up my own instance. It kind of did what I wanted, but like so many before it (Diaspora, GNU Social, etc) it didn’t really work because no one was there generating content. It’s the age-old problem of adoption. That all changed in 2022 and now I find Mastodon does pretty much what I want thanks to relays and folks just plain-old posting there. I do have a Bluesky account and that place feels a lot like Twitter did back when it was useful. But I think we know the inevitable result will be the same once the VC money runs out. I’ve also been playing around with Pixelfed and, thanks to the train wreck over at Reddit, Lemmy. Something to be a bit excited about, at the very least.