Archive for 2008
Using Cals: What is Needed
by Russ Knize on Jun.04, 2008, under Automotive Electronics
To use any of these calibrations, you will need to get the necessary equipment and modify your Engine Control Unit (ECU). There are basically two ways to go about putting a calibration onto an ECU. You can either use a socketed EEPROM (electrically erasable programmable read-only memory), which must be removed and programmed outside the ECU, or you can modify the ECU so that the EEPROM can be erased and programed remotely (“flashed”), which requires the necessary software and cables. The ECUs actually come from the factory with EPROMs, which must be erased with ultraviolet light. The ability to flash the ECU is especially useful if your ECU is a SMEC (single module engine controller) or SBEC (single board engine controller), which are located behind the battery and have electronics that are buried is potting material. If you have a logic module (1987 and earlier), it is located in the passenger compartment behind the passenger-side kick-panel and is not potted.
Hardware
If you intend to use removeable EEPROMs, you will need an EEPROM programmer. If you intend to use EPROMs (which I sometimes do), you will need an EPROM eraser. I own a Needham’s Electronics EMP-10 programmer and a Datarase II EPROM eraser. If you plan to flash your ECU, then you will need a cable and interface, as well as somewhat more extensive modifications to the ECU. The interface is available as a kit from Chad Clendening. The modifications needed to flash a SMEC were documented by Graem Schmidt in his very useful document.
Software
There is a nice variety of software forming around this effort. They are listed below:
- D-Cal – a very nice graphical calibration utility by Derek Beland
- ChEM – the original graphical calibration utility by Geoff Allan
- SMECFlash – utility by Chad Clendening needed to flash a SMEC via his serial interface
ECU Modifications
Obviously, some modifications are needed to your ECU to facilitate installing custom calibrations. If you plan to use the removeable EEPROM method, you will only need a 28-pin socket and some extra EEPROMs (or you can just reuse the EPROM you already have if you have an eraser). You will then need to desolder the EPROM from the ECU board and solder in the socket. If you are not skilled with a soldering iron, then I would recommend finding someone who is. The boards are double-sided and can be tricky to work on without damaging the traces. If you are planning to flash the ECU, then you don’t necessarily need a socket, but I would recommend one just in case the EEPROM gets fried. See Graem Schmidt’s document for additional details about the modifications needed to flash a SMEC.
For the socket, you should at minimum get a low-profile, machined pin socket such as Digikey ED3628-ND or A409-ND. Preferably, you should get a low-profile ZIF (zero-insertion force) socket, such as Digikey 3M2803-ND or A347-ND. The ZIF socket makes extraction and insertion much easier and safer for the chip and the ECU board, though probably isn’t necessary if you plan to flash. If you have one of the Mopar Performance ECUs, then you might get lucky as they are sometimes already socketed.
The EEPROM you need depends on the model year ECU that you have. The 1984 electronics are probably not suitable for custom calibrations. They apparently use bipolar PROMs (similar to PALs) and little has been done to understand them at this point (though that doesn’t mean it is not possible). The 1985-1986 electronics use a pair of 16kx8 EPROMs (one for the code and one for the calibration tables), but they do not have a hardware timer and it doesn’t take much to upgrade to the 1987 electronics, which were the best from the Logic Module era. These are the devices used on the various modules:
- 1985-1986 Logic Module: pair of 8kx8 EPROMs (27C64)
- 1987 Logic Module: 16kx8 EPROM (27C128)
- 1988-1989 SMEC: 16kx8 EPROM (27C128)
- 1990-1993 SBEC: 32kx8 EPROM (87C257)
The 27C/87C series EPROMs require an ultraviolet eraser to clear them. The 28C series EEPROMs are erased by the programmer itself. The 128 kilobit size has been obsoleted by most manufacturers but it can be replaced by the 256 kilobit parts, which have the same number of pins. Therefore, the part you want to get for 1987-1989 electronics is the 28C256, 150ns, industrial temperature (-40 to 85^C) EEPROM, Digikey AT28C256-15PI-ND. If you don’t plan to flash your ECU and have an ultraviolet EPROM eraser, you can get the 27C256 EPROM equivalent for about one third of the price (Digikey FM27C256QE150-ND). Since the 1987 logic module only uses half of the 256 kilobit part, you can connect the A14 pin (pin 1 on 28C256 or pin 27 on 27C256) to a switch that either grounds or raises it to 5V and program two, seperate calibrations in (i.e. street vs race or new vs previous cal).
The Daytona: May 23, 2008
by Russ Knize on May.23, 2008, under Daytona
Last night/this morning I finally fixed a few pressing issues. One was the boot on the driver’s inner CV joint had chewed through itself a while ago and I’ve been meaning to put a new one one there for some time. I discovered that the Driveshaft Shop Level 3 axles have the tripods welded to the shafts, so they have to be taken apart from the outer CV end. Also, the inner joints have some kind of fiber reinforced plastic cap that seems to be there to keep the tripod in the tulip housing. The problem is the boot seals to the cap and the cap seals to the tulip with a rubber seal. On the other axle, grease is coming out between the cap and the tulip, so I am going to have to deal with that at some point..
The big project was replacing the shift fork pads on the 1-2 and 3-4 forks. I’ve been limping 3rd gear along for over a year now, as I cheezed it pretty bad on a hard shift one day but it was still usable. A week or so ago I did the same to 2nd gear, rendering it useless. I hoped it was just the pads and so I bought some new ones. Thankfully, that’s all it was. The trans looked clean inside, though the sprags for 3rd and especially for 2nd gear are pretty chewed up. It shifts great now, so I am not going to worry about it.
Finally, both of the outer tie rod ends are so sloppy that they have about 1/2″ of play now. They are only a few years old, so no more Moog suspension parts for me. I got the more expensive ones from NAPA (Spicer I think). Same brand as the new ball joints that replaced the failed Moog joints and are holding up well.
NEdit
by Russ Knize on May.22, 2008, under Linux
“NEdit is a multi-purpose text editor for the X Window System, which combines a standard, easy to use, graphical user interface with the thorough functionality and stability required by users who edit text eight hours a day. It provides intensive support for development in a wide variety of languages, text processors, and other tools, but at the same time can be used productively by just about anyone who needs to edit text.” Features include:
- Very complete functionality. NEdit is the primary editor for thousands of Unix and VMS programmers.
- Thorough consistency with Motif, MS Windows, and Macintosh conventions.
- Designed for intensive use: keystroke efficiency, fast response time, streamlined interaction.
- Unlimited undo.
- True multi-window, fully graphical design.
- Mouse-based editing.
- Secondary/quick action selections.
- Fully integrated rectangular selection.
- Interactive WYSIWYG dragable selections.
- Maximum compatibility with X, Motif, and inter-client protocols, for interaction with the widest possible range of X programs and systems.
- Easy to learn: just point and type.
- Capabilities are clearly organized and presented in top-level menus.
- Comprehensive on-line help.
- No special knowledge of X Windows required, all important options are GUI-settable within the program.
- State of the art syntax highlighting with built-in patterns for C, C++, Java, Ada, FORTRAN, Pascal, Yacc, Perl, Python, Tcl, Csh, Awk, HTML, LaTeX, VHDL, Verilog, and more.
- Auto-indent, programmable language-sensitive smart-indent.
- Block indentation adjustment.
- Parenthesis flashing and matching.
- Find lines directly from compiler error output.
- Tab emulation.
- Unix ctags support.
- Client/Server mode for integration with software development tools.
- Programmable: Learn / Replay.
- Easy to use C-like macro language, safe and fully interruptable.
- Includes a library of over 150 built-in editing functions.
See the online documentation and the Wiki for more information.
NEdit is the most powerful and induitive editor that I have found that is available for all of the different types of systems that I use (Linux, Solaris, Windows, etc). The interface is somewhat dated due to its Motif-based GUI, but there are ways to improve its looks and customize the interface.
In Linux, NEdit can have difficulties when trying to make use of the resident Motif libraries. In particular, the GNU lesstif implementation causes a number of problems that lead to frustration. This version is linked against OpenMotif which tends to fair much better. The current stable 5.5 version is quite old and running into problems the more recent XOrg servers, glibc locales, etc. Many of these issues seem to be fixed in CVS, so I am offering a CVS snapshot of the upcoming 5.6 release here.
Packages
Here is the latest CVS snapshot:
- nedit_5.6~cvs20100114-rknize1_i386.deb
- nedit_5.6~cvs20100114-rknize1_amd64.deb
- nedit_5.6~cvs20100114-rknize1_i386.changes
- nedit_5.6~cvs20100114-rknize1_amd64.changes
- nedit_5.6~cvs20100114-rknize1.dsc
- nedit_5.6~cvs20100114-rknize1.diff.gz
- nedit_5.6~cvs20100114.orig.tar.gz
If you are using Debian Etch, you will find that the OpenMotif libraries are missing from the release. You will need to install these backports:
- libmotif3_2.2.3-3_i386.deb
- libmotif3_2.2.3-3_amd64.deb
- libmotif-dev_2.2.3-3_i386.deb
- libmotif-dev_2.2.3-3_amd64.deb
- motif-clients_2.2.3-3_i386.deb
- motif-clients_2.2.3-3_amd64.deb
- openmotif_2.2.3-3_i386.changes
- openmotif_2.2.3-3_amd64.changes
- openmotif_2.2.3-3.dsc
- openmotif_2.2.3-3.diff.gz
- openmotif_2.2.3.orig.tar.gz
Changes in these packages from original Source
- Added proper GNOME/KDE/OpenDesktop desktop and MIME integration.
- Created wrapper scripts to launching NEdit safely and also to the background.
- Added some shell prompt shortcuts.
The Daytona: April 23, 2008
by Russ Knize on Apr.23, 2008, under Daytona
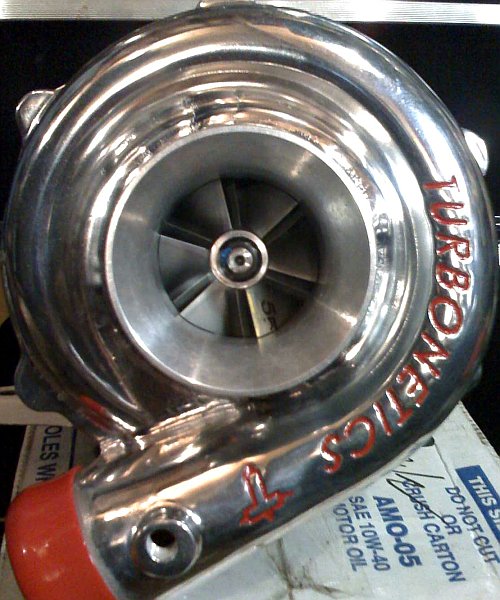
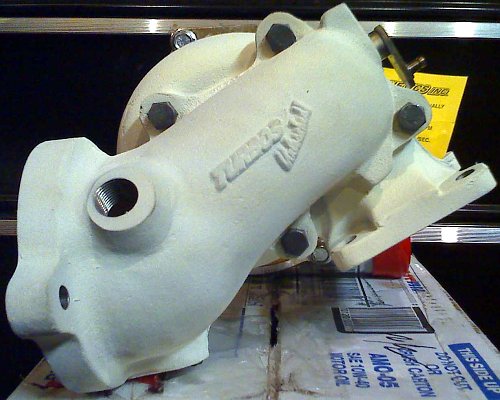
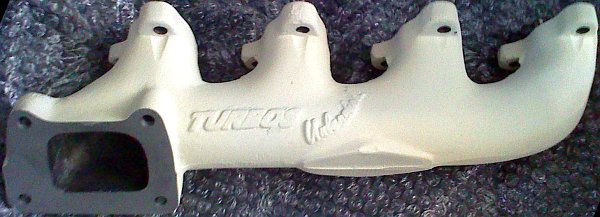
Still my daily driver. Been collecting some odds and ends that should hopefully help the spool department: A Turbos Unleashed cast log header and Turbonetics T03/T04E hybrid single ball bearing turbo with a “Super 50″ compressor and a Stage II exhaust turbine in a .63 A/R housing attached to a Turbos Unleashed 3” swing valve (whew). The header, housing, and swing valve are all ceramic thermal coated to keep temps down and gas velocities high. The turbo flange on the header is larger than it should be, so I will likely need to port the housing flange somewhat.
The Super 70 and ported exhaust manifold that is in there now will end up in the CSX once I get a new cylinder head for it. Trouble is the CSX needs to be running before I put this setup in there….
The CSX: April 6, 2008
by Russ Knize on Apr.06, 2008, under CSX
Well it’s been about a year and a half since I drove the car. This weekend I finally got a chance to tear into it. I pulled the head and tore it completely down. This crappy reman head is pretty screwed-up. The three rear coolant jackets have been ground out and rewelded at some point. There is a small crack between one of the forward jackets and the chamber. The cam journals are pretty chewed-up too, so I think this head is done. Too bad too because it has tight guides and fairly new valves. The plan is to use the original head that came off this car when I got it back in 1998, which appears to have been junkyard TBI roller cam head as the exhaust valves are pretty burnt up. It also has some small cracks starting in the rear jackets, but they are not threatening yet and can be relieved. The guides are worn as well and so it needs a complete rebuild….
I also pulled the trans in preparation for the new TU ceramic/organic clutch that’s been sitting on a shelf waiting for a chance to be installed. I also checked the input shaft and diff carrier play and they seem to be holding up well. I had a little trouble removing the passenger side axle due to the OBX’s tendency to collapse slightly when the bearings are installed. A bit of tapping persuaded it out.
Back to the head…a month or so ago I decided to use this head as my first attempt at head porting. I figured it was no big loss if I ruined it and was still usable if I didn’t. It turned out much better than I thought it would. I made a few mistakes, but it should still flow much better than stock so I figure why not try to run it and see how it does.
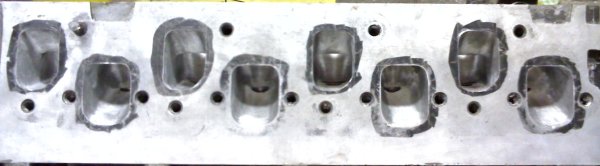
Intake, before and after (click for higher resolution):
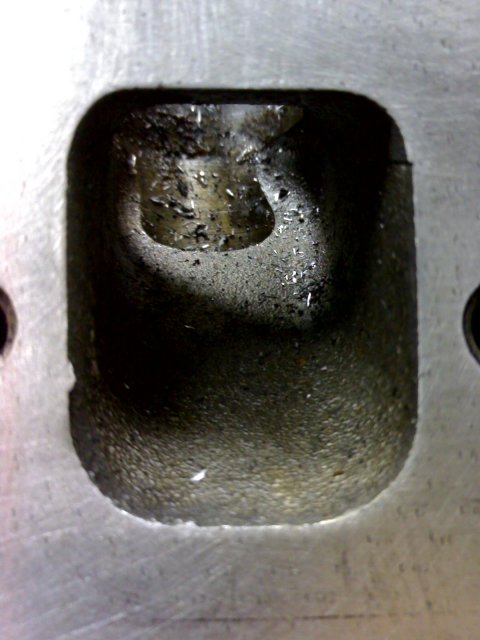
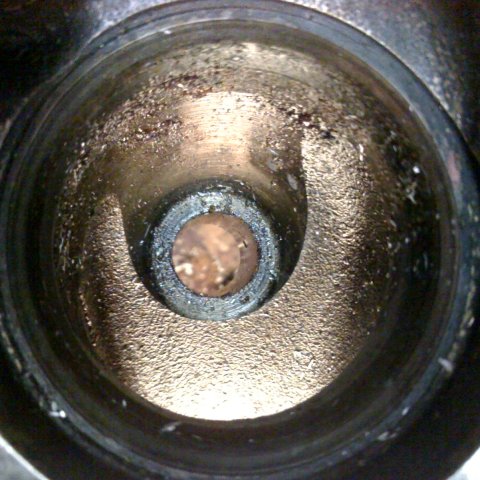
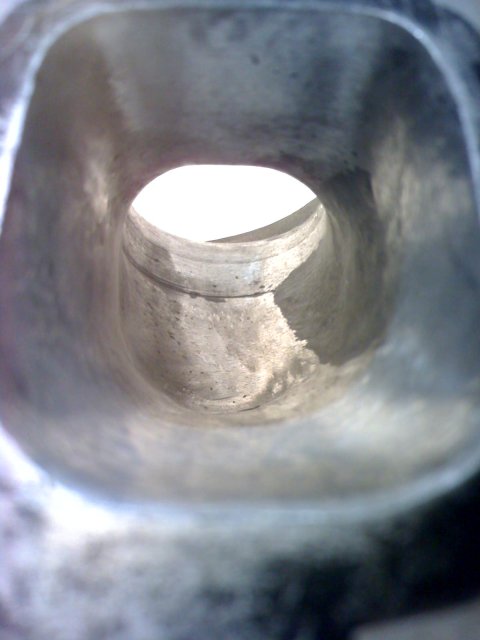
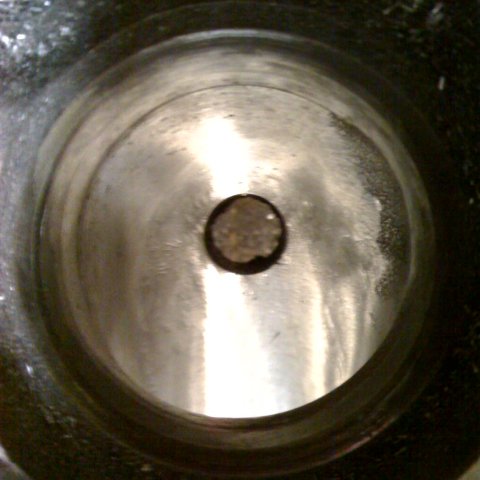
Exhaust, before and after (click for higher resolution):

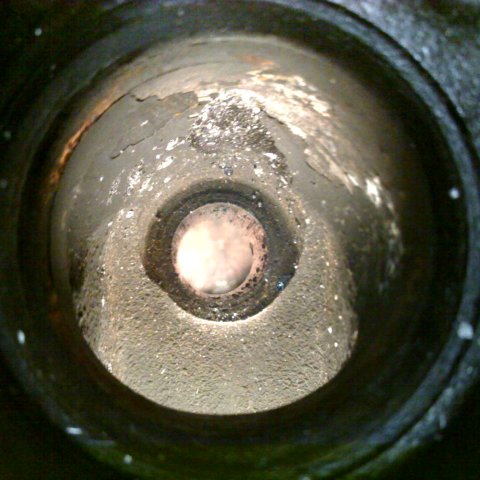

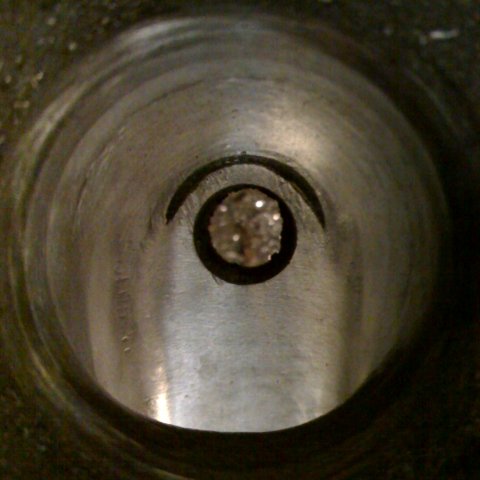
The bowls were cleaned up and the ports straightened and blended. The roof of the intake was raised considerably (too much over near the bowls) and the roof of the exhaust was also raised slightly (there is a coolant passage that needs to be watched out for). I also filled the area on one side of the intake ports where core drift always leaves a pocket the undercuts the seat with JB Weld. This is probably where Steve Menegon does it, but I didn’t look that closely at his head on the Daytona before installing it. The floors were smoothed and blended, but otherwise left alone. I did lay back the floor at the exhaust bowl more on the advice from Tyler. I’m now coming up with a way to de-shroud the valves so that it is done equally.
Oil Filters Revealed
by Russ Knize on Jan.24, 2008, under Automotive, MiniMopar
The old Oil Filter Study page has been replaced by a new article: Oil Filters Revealed. It has received a major update to bring it inline with the current market, lots of new pictures, and some completely different filters as well. Many weeks of research went into this one.