Daytona
The Daytona: November 17, 2003
by Russ Knize on Nov.17, 2003, under Daytona
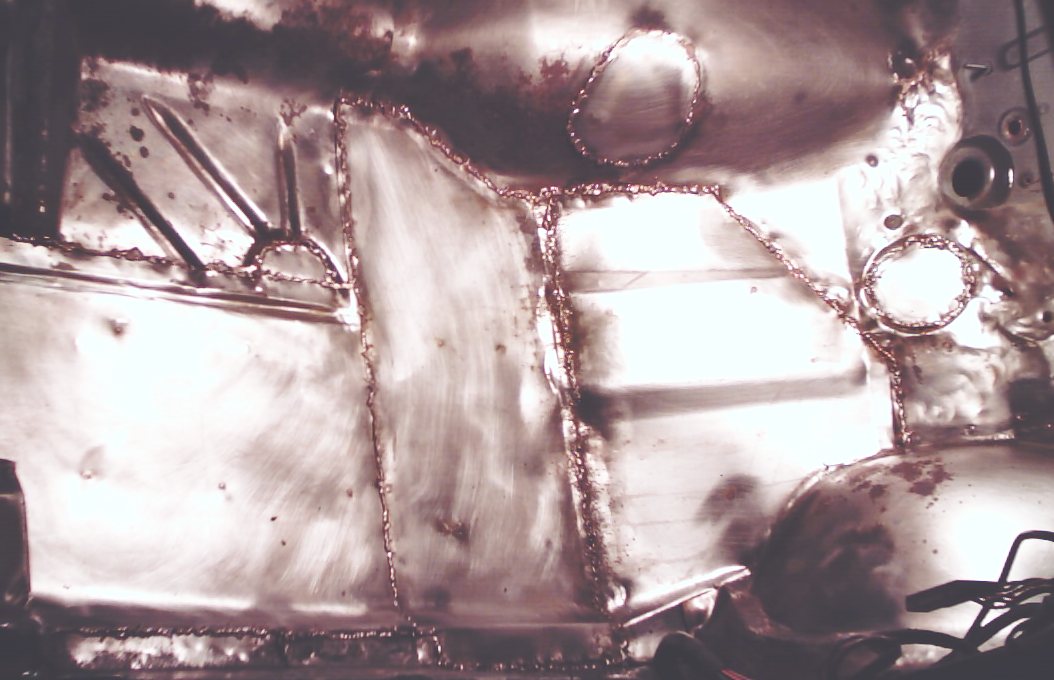 Progress has been slow but steady on the floorpans. The passenger side is welded back in. I ended up getting a MIG welder, as it is the only way to do sheet metal (short of TIG). It definately makes the job much easier and better-looking than trying to do it with a stick welder (less cleanup). I did get one of those stitch welders off of eBay for $20. For stick welding small stuff, it really does help. The rod doesn’t stick to the piece and you don’t have to worry so much about burn-though. Before welding the plates in, I painted the frame rail and the bottom of the plates with POR-15 Chassiscote Semigloss Black. I have had good luck with POR-15 in the past, but this will be the real test. Obviously, I had to take a wire wheel to the places that I welded the plates to the frame because the paint was burned away. I will go back and touch those up. Also, I won’t be using the semigloss stuff again. The finish is very random with using a brush to apply it. Spraying it probably works better.
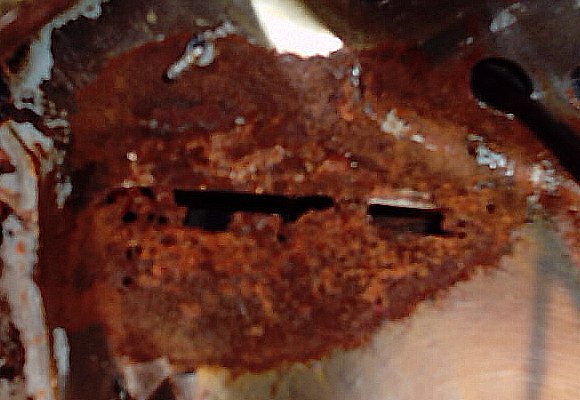
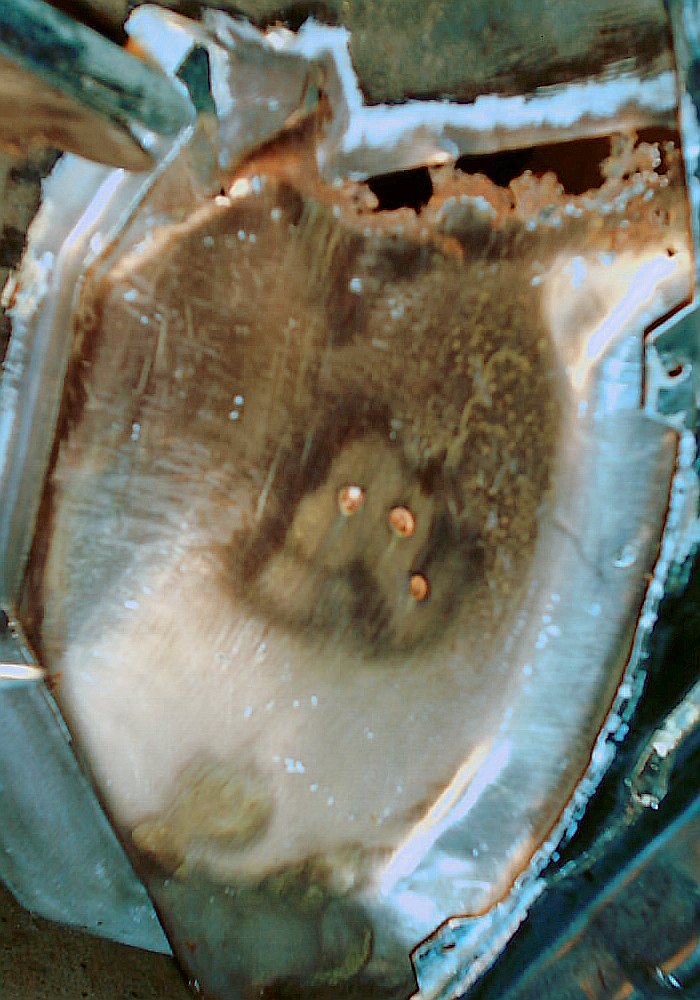
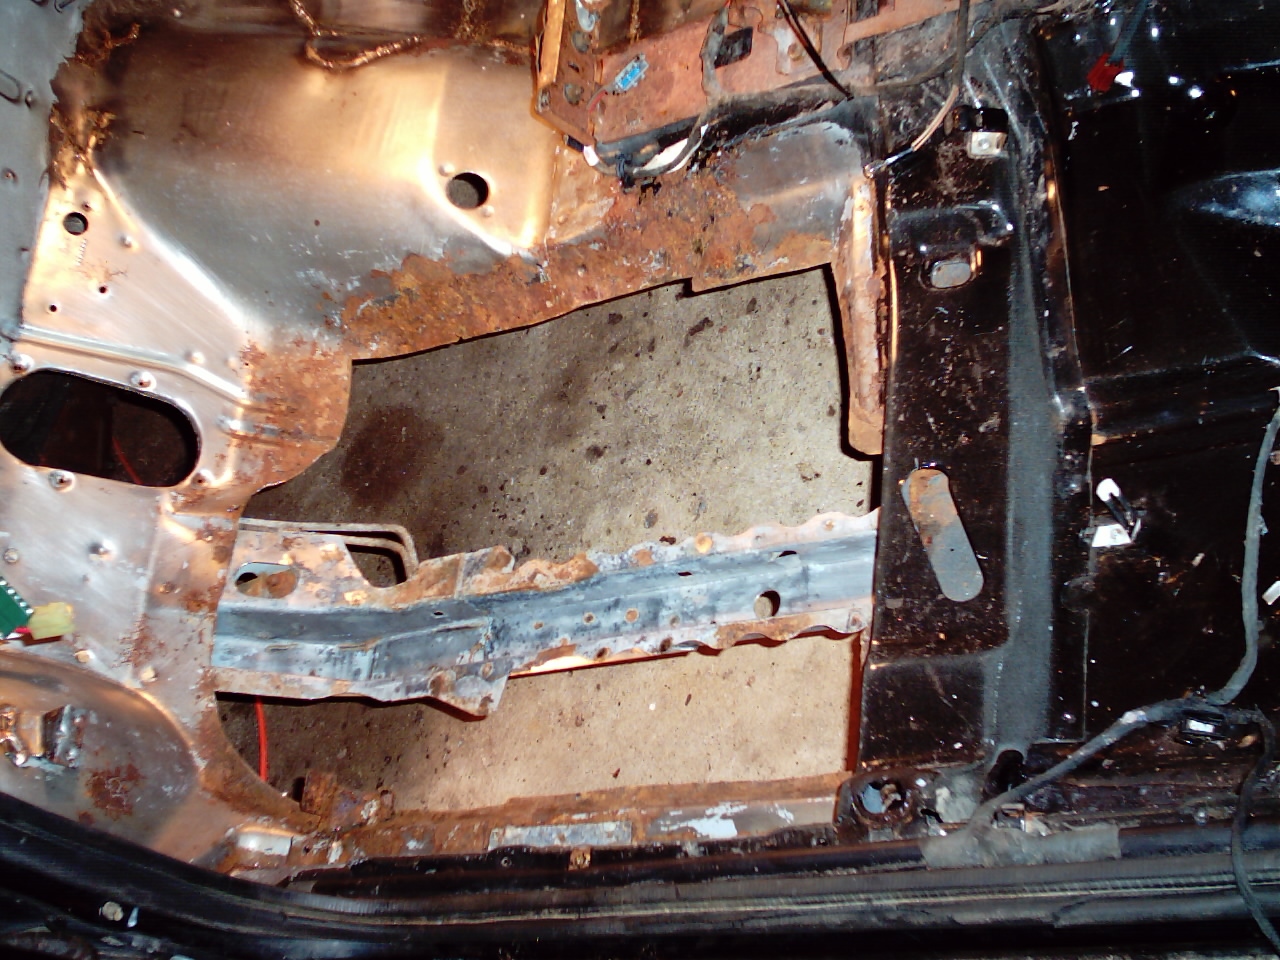 The driver’s side is out and the paint stripped. I was disappointed to find the rear K-frame mount on that side is bent as well. This one is bent down instead of up. Even so, I was unable to straighten it. I may give it one more shot with brute force (dropping the car on a jack stand) before welding, though. That’s the only way I’ve ever been able to straighten heavy gauge frame rail steel in the past. Also, the driver’s side fender is rusted out pretty bad at the top where it meets the firewall. This area is prone to rust on these cars if it has ever been in an accident. The body caulk cracks and then water, salt and debris gets packed into the seam by the wheels. The passenger side is rusty too, but still solid. If you see any cracks in the body caulk from the fenders, make sure the inside doesn’t look like this:
The Daytona: October 14, 2003
by Russ Knize on Oct.14, 2003, under Daytona
Well, the car has pretty much been sitting all summer. I spent most of it working on the house and yard, but I do now have 60A service to the garage. I also have a compressor and a stick welder. I just hope I get the paint on the car before the weather turns cold. I have a heater, but I don’t dare use it while painting.
I started getting serious with the floorpans a few weeks ago, but then work sent me out of the country for two weeks. I now have all the rotted sheetmetal out of the passenger side (ended up being most of it). The damage from the previous owner’s incident with the pothole is quite extensive. Much of the floorpan and firewall on that side is buckled and cracked, which is what caused it to rot out. The frame rail was pushed up and outwards, but remained completely rust-free. Apparently, the impact to the front of the K-frame, caused the K-frame to “pivot” on its front mount and mash the rear mount up and back. Quite franky, the car isn’t worth fixing, but it is too late for that now. I managed to push the frame rail back down and over somewhat. The position of the rear K-frame mount still isn’t right, but I think it is closer to where it should be. I bent some really huge 2″ angle iron and plate steel trying to straighten the thing out. I will compensate by shimming down the K-frame on that mount and hogging-out the stud hole to give me more freedom. Hopefully it will be enough. The right-front K-frame mount is squashed and only partially connected to the frame rail, but it is accessible enough to fix. Right now, I am stripping the paint off of the remainder of the floorpan and rail so that I can paint everything with POR-15. The last thing I want is to have all this work rust-out on me. If the car still shakes under acceleration after all this, I will be really pissed.
The Daytona: May 30, 2003
by Russ Knize on May.30, 2003, under Daytona
I got the rear brakes put back together, finally. I originally took them apart to try to fix a squealing problem back there. I believe it was due to a broken spring on one of the brake shoes. I also wanted to bleed the brake system and flush it out with new fluid. Even though the brakes and lines are suprisingly unrusty, the bleeder on the left side snapped off. After breaking an extractor trying to get it out, I just replaced the cylinders on both sides (less than $10 each :). Of course, the flare nuts were frozen to the brake lines (which weren’t even rusty), but I was able to spin the cylinder off the nut. On the right side, the grease around outer bearing was contaminated with water and grit and the spindle nut was even rusty. The dust cap seems OK, so I just flushed out all the grease with gasoline and repacked the bearings. The races looked fine, so I didn’t bother replacing anything. Some new brake hardware and grease seals later, it was all back together.
I always like to get into everything on a new (ha!) car to get a handle on where things are. The shoes themselves seemed new and I know the front pads are new, so I should be good in the brake department. Another thing that I thought was odd was that the emergency brake cables are NOT frozen! The car is an automatic, so I doubt they were ever used. For whatever reason, these cables are plastic-coated. All of the ’87 Daytonas and Shadows I’ve seen were just steel and would rust within a year or two, while my ’88 had the coating. This car gets weirder and weirder.
The Daytona: May 27, 2003
by Russ Knize on May.27, 2003, under Daytona
I think I have decided what paints I am going to use. In the interest of not having to worry about rusting under the primer, I will take the body down to metal, spray with POR-15 clear, POR-15 tie-coat primer, and PPG color and clear coats. The underbody and fenders will get the POR-15 underbody treatment in semigloss black. That should intomb the metal for all eternity. I also need to think about how I am going to weld in the plates to patch up the underbody and straighten-out the front end. At the moment, the driver’s side door is partially stripped and the rear end is in the air so that I can investigate the squeaky brakes and bleed the lines. As usual, the bleeders snapped off when I tried to remove them, so hopefully I will be able to extract them. If not, new cylinders are only $15.
The Daytona: May 23, 2003
by Russ Knize on May.23, 2003, under Daytona
Haven’t done much work to the car lately, but I have stopped driving it. I went to take care of some rust that was forming just above the bumper strip on the passenger-side door. What I uncovered was that the strip was attached to the door with silicone rubber and under it was all rust. In a few places it did rust through, but since it is under the strip, I’m not concerned. It appears that the door had been hit at some point, as there are holes drilled in random places, probably from a dent pull-out tool. Whoever straightened the metal did a good job, but they didn’t bother painting it! So, it looks like I am going to have to DA the whole door and repaint it. The paint is cracking in several places anyway, probably due to rust forming. I see the same thing happening on the passenger-side front fender as well as the hood, but nowhere else. Hopefully I’ll have a compressor soon, so I will be able to do a proper painting job. This will be the practice I need to repaint the Shelby.
The Daytona: January 28, 2003
by Russ Knize on Jan.28, 2003, under Daytona
I found the damn electrical load that was draining the battery. The battery wouldn’t last sitting for more than about 2 days. I measured about a 300mA drain, which is a lot! I isolated it to the power seat/power door lock circuit, which made so sense since I have no power seats and the power door lock motors draw many amps when they are on. A quick glance at the wiring diagrams revealed the horn circuit also being fed from this circuit. The horn doesn’t work and I never looked as to why. It appears that the steering column wiring for the horn switch is shorted and it was disabled at the horn itself. Unfortunately, this left the horn relay on at all times and, apparently, and relay coil draws about 280mA. Anyway, I yanked the relay and now everything is fine. I still see about 22mA of drain, 4 of those are for the Dawes Devices A/F guage, which was tied right to the battery. The rest must be the radio and clock, I guess.
The Daytona: January 21, 2003
by Russ Knize on Jan.21, 2003, under Daytona
I re-replaced the left-front wheel bearing. It went rather easily, considering what a pain it can be. The assembly came out with a sledge and went in easily with a pair of C-clamps. The only major problem I ran into was that the new rotors had rusted to the new (failed) hub assembly. Ended up having to use a hydraulic puller and a sledge to get it off. I think it rusted around the center of the hub, so I dabbed a little anti-seize on there.
For an encore, I went to tighten a hose clamp on the heater bypass valve when it went “click”. Damn, and I was doing so well. It was a Mopar unit and it was as if the plastic has broken-down. Instead of being brittle, it had the consistency of hardened rubber hose. It just crumbled in my fingers. I had the spare from the Shadow, but since it had the new-style intake (bypass valve under the battery tray), the valve inlet points the wrong way. I managed to find a nylon elbow that I could use for now. I bought a new one at Auto-Stoned for $12. It was the all-plastic one, like the one from my Shadow. It lasted for over 7 years, so I won’t complain.
The Daytona: January 20, 2003
by Russ Knize on Jan.20, 2003, under Daytona
Had a little scare with the Daytona’s engine…thought I blew it. When I pulled the fuel pressure regulator, the vacuum line appeared to be disconnected. That may explain why it was running rich, but it shouldn’t run at all at 10psi of boost. Anyway, that coupled with some apparent oil coming out of the dipstick and the fact that is was missing at idle, I thought I cracked a ringland. Well, I snugged up the dipstick and after installing the new adjustable FPR, it seemed to run fine. I did a compression check and it was the same as before: about 130psi on all four. The plugged looked perfect. I guess I’m OK, but it still starts missing on one cylinder if it is left idling for a while. That Dawes Devices A/F gauge has rather dim green LEDs, so it’s hard to see them in the day and I don’t know if I am rich or so lean that I’m off the scale. I might just install my old Cyberdyne so I can see what is going on.
Since it is an early-style T1 intake, I had to use a universal adjustable fuel pressure regulator from FWD Performance. I managed to install it in the same location as the stock unit by grinding-out part of the bracket to clear the return line fittings. I also had to bend the short pipe for the return line on the fuel rail slightly to clear the unit. The regulator has 3 fittings: two -4 AN fittings on the bottom (outlet in the center and inlet to the side) and a 1/8″ NPT pipe fitting on the side for a pressure gauge. I was lazy and just used two brass 1/4″ flare fittings for the inlet and outlet. I placed an o-ring at the base of the flare fitting threads, which sealed the fitting to the regulator housing. I also used Teflon tape on the threads so the threads were not so loose. I then wedged a piece of aluminum between the two fittings so they would not turn when I installed the rest of the brass pipe fittings. I enlarged the hole in the stock bracket slightly and used the 1/4″ NPT street elbow to mount the regulator to the bracket (between the elbow and flare fitting). A 1/4″ NPT to 3/8″ hose adapter was mounted to the elbow (inlet) and a 1/4″ NPT to 1/4″ hose adapter to the center flare fitting (outlet). In order to the fuel gauge fitting to face upwards, the elbow is rotated such that it is pointing somewhat towards the valve cover, similar to the stock regulator. It’s a little tight between the two hose fittings, but it works and looks decent.
The Daytona: January 16, 2003
by Russ Knize on Jan.16, 2003, under Daytona
Haven’t done much due to time constraints. The gas mileage is really poor, maybe due to the stock FPR being unable to dump off the extra fuel from the Walbro 192 fuel pump. Time to put the adjustable unit in, I guess. I also bought new GM “WeatherPack” connectors for the coolant and air charge temp sensors. They both have broken tabs and the coolant sensor code keeps getting set. I will also be stripping the interior from a fellow club member’s ’86 Laser with the same interior color. The Daytona’s interior has many broken parts, so hopefully I’ll be able to get one good interior from the two.
The Daytona: December 23, 2002
by Russ Knize on Dec.23, 2002, under Daytona
Fixed a few odds and ends on the days I had off from work. The big thing was the driver’s side door. It has a new latch, new pins and bushings, and I repaired the door jam wiring. The window still gets cocked funny on the way up, which causes it to hang up. The rubber is in really bad shape, so I’m sure that is not helping. It’s nice to have a fully-working door, though. Removing the lower door pin is a real PITA. After trying several approaches, I had to Dremel part of the bottom tip off so that I could get a C-clamp in there and press it out. There is no way to punch it out with those damn Turbo Z ground effects in the way. I supported the door with rope strung over the garage ceiling rafters, looped through two holes in the door frame.